Cant Get Ink Cartridge to Feed Pen
If your Epson Stylus Photo 1400 has any problems, see these sections for solutions:
Note:
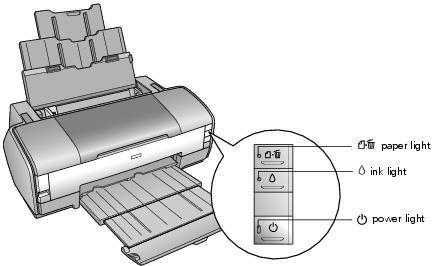
If you need help identifying parts on your Epson Stylus Photo 1400, see Printer Parts.
| Lights | Explanation |
| Green | The printer is receiving a print job, replacing an ink cartridge, charging ink, or cleaning the print head, or a camera is connected to the |
| Red | If you're printing on paper, your paper ran out or multiple pages have fed at once. Load or reload paper, then press the If you're printing on a CD or DVD, the CD/DVD tray is not inserted. Follow the instructions in Inserting a CD or DVD to insert the tray, then press the |
| Red | If you're printing on paper, it is jammed in the printer. Press the If you're printing on a CD or DVD, the CD/DVD tray has not ejected. Pull out the tray and press the |
| Red | An ink cartridge is nearly expended. Check the message that appears on your screen to determine which cartridge is nearly expended or follow the instructions in Checking the Ink Status. Make sure you have a replacement cartridge. |
| Red | An ink cartridge is expended or not installed. Make sure you have a replacement cartridge, then follow the steps in Replacing an Ink Cartridge to install it. If you have just installed a new cartridge, it may be incompatible with the printer or incorrectly installed. Reinstall it or replace it with a compatible cartridge, as described in Replacing an Ink Cartridge. |
| Red | Paper is loaded for printing, but the CD/DVD tray guide is open. If you want to print on paper, close the CD/DVD tray guide. If you want to print on a CD or DVD, remove the paper from the sheet feeder. |
| Green | An unsupported device is connected to the |
| The | Paper may be blocking movement of the print head or the printer may have an internal error. Turn off the printer, then open the cover and remove any jammed paper or other foreign objects. Wait a few seconds, then turn the printer on again. If the lights are still flashing, contact Epson as described in Where to Get Help. |
| 3. | Press the |

Tip:
Periodically, it's a good idea to check Epson's support website (U.S. or Canada) for free updates to your Epson Stylus Photo 1400 printing software. With Windows, you can also click ![]() or Start menu, select Programs or All Programs, select EPSON, and click E PSON Stylus Photo 1400 Series Driver Update for printer driver updates.
or Start menu, select Programs or All Programs, select EPSON, and click E PSON Stylus Photo 1400 Series Driver Update for printer driver updates.
If the print head stops moving or the printer stops making noise, but the green ![]() power light is still flashing after 5 minutes, turn off the printer. If the light is still flashing when you turn it back on, contact Epson as described in Where to Get Help.
power light is still flashing after 5 minutes, turn off the printer. If the light is still flashing when you turn it back on, contact Epson as described in Where to Get Help.
| • | Run a printer check. If the test page prints, make sure your software is installed correctly. You may need to uninstall your printer software and then reinstall it. |
| • | If you print continuously for an extended period, the paper may temporarily stop feeding or the print head carriage may pause for a while to prevent the printer mechanism from overheating and being damaged. If this happens, you can continue to print but Epson recommends that you stop and leave the printer on for about 30 minutes. After 30 minutes, turn the printer off and on and it should print at normal speed. |
You don't see the printer icon in the lower right corner of your screen (taskbar) in Windows.
| 1. | Windows Vista: Click |
Windows XP: Click Start, select Control Panel, then select Printers and Faxes. Then right-click your printer icon and select Printing Preferences.
Windows 2000: Click Start, point to Settings, then select Printers. Then right-click your printer icon and select Printing Preferences.
| 3. | Click the Speed & Progress button, then click the Monitoring Preferences button. |
| 4. | Click the Shortcut Icon box. Then click OK in each of the open windows to close them. |
Make sure your system meets the requirements listed in System Requirements. If you're printing a high-resolution image, you need more than the minimum requirements listed. You may also need to:
| • | Select Grayscale in your printer settings if your document doesn't include color. |
The red ![]() ink light is flashing or on after you replace a cartridge.
ink light is flashing or on after you replace a cartridge.
| 2. | Press the |


| • | Clear the High Speed check box in your printer settings. |
| • | Select Thick paper and envelopes in your printer software. Access the setting from the printer settings window as follows: |
Windows: Click the Maintenance tab and select Printer and Option Information.
Macintosh: Select Extension Settings from the pop-up menu.

Caution:
Don't open Epson Status Monitor, pause printing, or respond to any ink messages when your printer is printing. This may cause your printer to pause and leave an uneven surface on your printout. If your ink is running low, wait until printing finishes before checking ink levels or attempting to replace a cartridge. If you must replace an ink cartridge in the middle of a print job, the quality of your printout may decline. For best results, check your ink levels and replace ink cartridges, if necessary, before printing large or high-resolution print jobs.
| • | Clear the Grayscale setting in your printer settings (for Windows). Change the ink setting in your printer settings to Color (for Macintosh). |
If you're printing on glossy paper, prints may be scratched if not handled properly. Don't place objects on top of your prints, and be careful not to scratch them with your fingernails. For best results, frame your prints under glass.
Note:
Store any unused paper in its original packaging in a dry area.
| • | If paper jams, press the |
Caution:
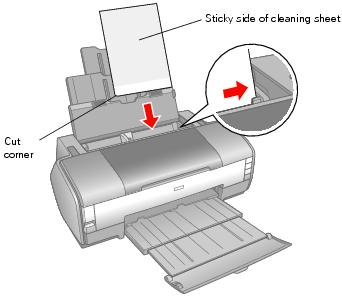
Do not use the cleaning sheets that come with Epson special papers; they may jam inside your printer.
Caution:
Do not follow the loading instructions on the sheet; they are not correct for your printer. Follow the steps here instead.
| 4. | Press the |
| • | Use the Print Preview option in your printer software to check your margins before you print. |
You may need to uninstall and then reinstall your printer driver and utilities. For example, this might be necessary when you upgrade your operating system. You don't need to uninstall Epson Print CD or this on-screen R eference Guide.
| 3. | Click |
| 4. | Point to Epson or Epson Printers, then select Epson Printer Software Uninstall. |
Note:
You may have to scroll down to see these folders.
Mac OS X 10.5: Select System Preferences, select Print & Fax, select EPSON Stylus Photo 1400, and click the — button.
Mac OS X 10.2.8, 10.3, and 10.4: Open the Applications folder on your hard drive, select Utilities, choose Printer Setup Utility or Print Center, select Stylus Photo 1400, and click Delete.
Source: https://files.support.epson.com/htmldocs/pho140/pho140rf/Probsolv.5.1.html
0 Response to "Cant Get Ink Cartridge to Feed Pen"
Enregistrer un commentaire